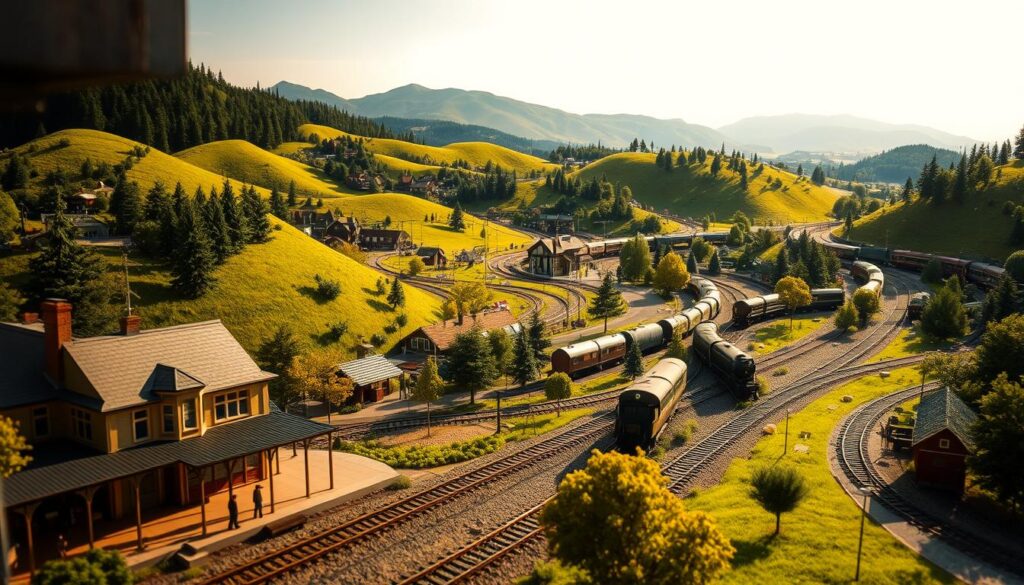
Did you know that over 500,000 people in the U.S. enjoy the art of creating miniature worlds? I was amazed when I first started exploring this hobby and learned about the model train scenery ideas. It’s not just about tracks and trains—it’s about crafting a realistic and immersive environment that tells a story.
When I began, I thought building a scenic layout would be complicated. But modern materials like extruded foam and simple adhesives make it easier than ever. With a little creativity, you can transform a plain base into a detailed and lifelike scene. Trust me, it’s not as hard as it looks!
Want to build your dream model railroad? Download my FREE guide

Privacy Policy: We hate SPAM and promise to keep your email address safe
One of my favorite tips is using foam to create hills, tunnels, and rivers. Adding color and texture with paints or ground foam brings everything to life. Brands like Woodland Scenics have been a game-changer for me. Their products are reliable and make the process fun.
Whether you’re a beginner or a seasoned hobbyist, this guide will help you create a layout that looks realistic and feels personal. You can also use my model railway planer tool. Anyway, let’s dive in and explore the possibilities together!
Key Takeaways
- Modern materials like extruded foam make building layouts simple and accessible.
- Using color and texture adds depth and realism to your scenery.
- Brands like Woodland Scenics offer reliable products for crafting.
- Start small with foam to create hills, tunnels, and rivers.
- Model railroading is an art form that’s fun and rewarding.
Getting Started with Model Train Scenery Ideas
Building a detailed layout begins with the right materials and a solid plan. Whether you’re new to the hobby or refining your skills, the foundation you create will set the stage for everything else. Let’s explore how to choose the best base materials and plan a realistic display.
Choosing Your Base Materials
Selecting the right materials is crucial for a durable and visually appealing layout. Foam insulation board is a popular choice because it’s lightweight, easy to cut, and holds shape well. Extruded foam is another excellent option, especially for creating hills, tunnels, and rivers.
Here’s a quick comparison of common materials:
| Material | Pros | Cons |
|---|---|---|
| Foam Insulation Board | Lightweight, easy to shape, affordable | Can be messy when cut |
| Extruded Foam | Durable, holds detail well, versatile | Slightly more expensive |
| Cardboard Strips | Cheap, readily available | Less durable, harder to shape |
When working with foam, always ensure proper ventilation, especially if using hot wire cutters. Brands like Woodland Scenics offer foam-compatible paints and ground foam for added texture and realism.
Planning a Realistic Layout
A well-thought-out plan ensures your layout looks dynamic and lifelike. Start by sketching your design, considering elements like curves, elevations, and natural features. Proper scaling and perspective are key to making your display look realistic.
Here are some tips for planning:
- Use curves instead of straight lines for a more natural look.
- Incorporate varied elevations to add depth.
- Add miniature structures and natural elements like trees and rivers.
Working systematically through the planning process will save you time and effort. Remember, a good base sets the stage for the rest of your project – even if it’s a small model railway.
Materials and Techniques for Realistic Scenery
The key to lifelike scenery lies in the materials and methods you choose. Whether you’re crafting hills, rivers, or rock formations, the right approach can make all the difference. Let’s explore some of the best options and techniques to bring your layout to life.
Extruded Foam vs. Plaster Methods
Extruded foam and plaster are two popular choices for creating realistic terrain. Foam is lightweight, easy to shape, and holds detail well. It’s perfect for carving tunnels, hills, and rivers. Plaster, on the other hand, is ideal for casting rock formations and adding a rugged texture.
| Material | Pros | Cons |
|---|---|---|
| Extruded Foam | Lightweight, easy to shape, holds detail | Can release fumes when cut |
| Plaster | Great for rocks, durable texture | Heavier, requires mixing |
When working with foam, always ensure proper ventilation. For plaster, mix it carefully to avoid air bubbles. Both materials have their strengths, so choose based on your project’s needs.
Adhesives, Latex Paint, and Matte Medium
Adhesives like water-diluted matte medium are essential for bonding materials. They’re easy to use and dry clear. This makes them perfect for attaching ground foam or other textures. Latex paint adds color and depth, while washes and drybrushing create natural shadows.
Here’s a quick guide to using these materials:
- Apply matte medium with a brush or spray bottle for even coverage.
- Use latex paint to base coat your terrain before adding texture.
- Finish with washes and drybrushing to highlight details.
Using Ground Foam for Texture
Ground foam is a game-changer for adding realistic texture to your layout. It comes in various grinds, from fine to coarse, to simulate different terrains like grass, dirt, or gravel. Apply it over a base of matte medium for a secure bond.
For best results, layer different grinds to create depth. Start with a fine grind for the base and add coarser grinds for highlights. This technique mimics the natural variation found in real landscapes.
By combining these materials and techniques, you can create a layout that’s both detailed and authentic.
DIY Scenery Basics for Model Railroaders
Creating realistic terrain for your layout doesn’t have to be overwhelming. With a few simple tools and techniques, you can transform a flat surface into a detailed, lifelike scene. Let me walk you through the steps I use to bring my projects to life.
Simple Steps to Form and Color Your Terrain
Start by shaping your base using foam or plaster. Foam is lightweight and easy to carve, making it perfect for hills and valleys. Plaster works well for rock formations and rugged textures. Once the form is ready, it’s time to add color and texture.
Apply a base coat of thinned latex paint in a medium tan shade. This helps create a natural foundation. Use a brush or spray bottle for even coverage, especially on uneven surfaces.
Let it dry completely before moving to the next step. Also, you’ll need a lot more paint for O gauge model railroad designs.

Next, lay down full-strength white glue in small sections. Sprinkle ground foam over the glue to simulate soil or grass. Use different grinds for variety—fine for base layers and coarse for highlights. This layering technique adds depth and realism.
Here are a few tips to avoid common mistakes:
- Choose lighter soil tones to prevent your layout from looking too dark.
- Work in small areas to ensure even glue and foam distribution.
- Layer colors and textures gradually for a natural look.
Finally, apply washes or drybrushing to enhance details. Washes add shadows, while drybrushing highlights raised areas. These finishing touches make your terrain pop.
Remember, practice makes perfect. Start small, experiment with techniques, and soon you’ll create a layout that’s both authentic and visually stunning. With a little patience and creativity, you’ll master the art of DIY scenery in no time!
Building Rock Formations, Tunnels, and Elevations
Adding dynamic rock formations and tunnels can transform your layout into a captivating masterpiece. These elements not only enhance the visual appeal but also create a sense of depth and realism.
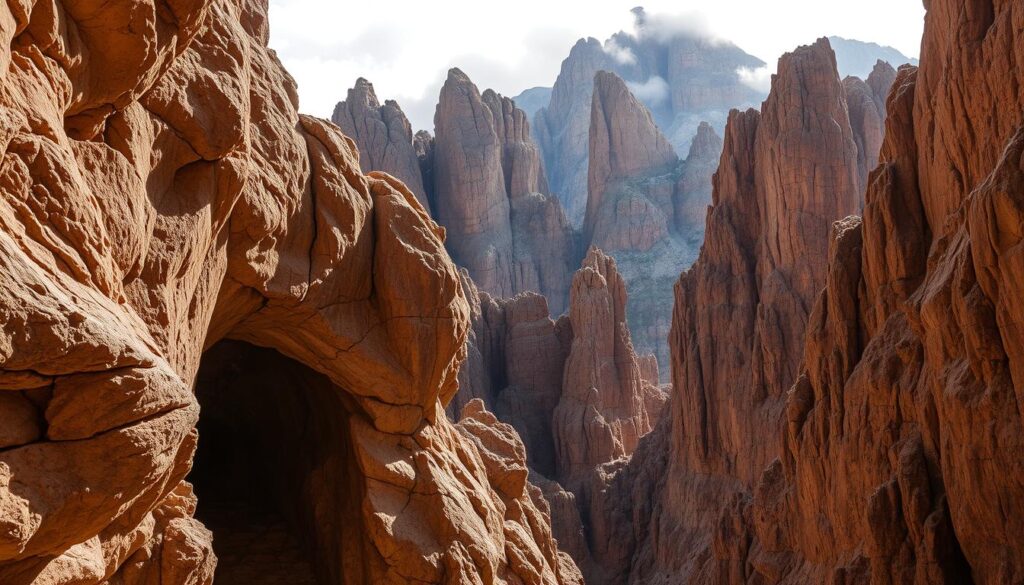
Casting and Carving Rocks
Creating realistic rock formations starts with the right materials. I often use plaster, Hydrocal, or patching plaster for casting. Rubber molds are a great tool for quick and efficient results. Simply pour the plaster into the mold, let it set, and you’ll have a detailed rock surface ready for painting.
For a more customized look, I carve rocks directly from foam or plaster. Adding thick layers of plaster helps blend the surfaces naturally. This method allows for unique shapes and textures that mimic real terrain. Remember to pay attention to detail—carving small cracks and crevices can make your rocks look incredibly lifelike.
Designing Tunnels for Artistic Layouts
Tunnels are more than just functional elements; they can be artistic focal points. When designing a tunnel, I consider both its purpose and aesthetic appeal. Foam is my go-to material for carving tunnel entrances, as it’s easy to shape and lightweight.
To add realism, I blend the tunnel entrance with the surrounding terrain. Using plaster or adhesive mixtures, I create a seamless transition between the tunnel and the rocks. Painting and drybrushing the surface with natural shades enhances the overall look, making it blend perfectly with the layout.
Here are a few tips to elevate your rock and tunnel designs:
- Use rubber molds for consistent rock textures.
- Layer plaster for a natural, rugged appearance.
- Blend tunnel entrances with the surrounding area for a cohesive look.
- Experiment with different painting techniques to highlight details.
By combining these techniques, you can create a layout that’s both functional and visually stunning. Don’t be afraid to experiment—every project is an opportunity to learn and improve. With a little patience and creativity, your rock formations and tunnels will become the highlight of your model railroad themes.
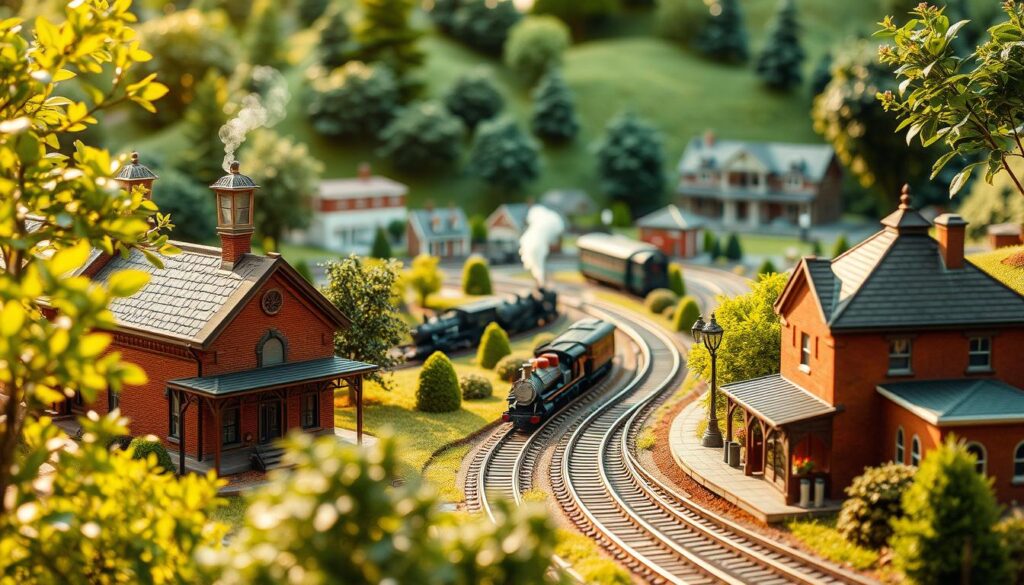
Adding Detail with Trees, Buildings, and Figures
Small details can turn a simple layout into a vibrant, immersive world. It’s amazing how adding trees, buildings, and figures can transform a flat surface into a lively scene. These elements enhance the visual appeal and tell a story.
Enhancing Woodland Scenics and Foliage
Realistic trees are a game-changer for any layout. I love using products from brands like Bachmann and Woodland Scenics. Their pre-made trees are incredibly detailed and save a lot of time. To make them even more lifelike, I lightly dust them with ground foam or use fine spray adhesives. This adds texture and depth, mimicking the natural look of foliage.
Here’s a quick tip: layer different shades of green for a more realistic effect. Start with darker tones at the base and gradually add lighter shades toward the top. This technique creates a sense of depth and makes your trees pop.
Incorporating Realistic Structures and Scale Figures
Buildings and figures bring personality to your layout. I often use prebuilt structures from Walthers and Atlas. They’re high-quality and fit seamlessly into the scene. When placing them, I always consider scale and perspective. A tiny figure by a station or a small house near the tracks can make a big difference.
Here’s how I approach it:
- Position buildings to complement the natural elements, like trees and rocks.
- Use figures to create little stories—a worker by the tracks or a family near a house.
- Balance man-made structures with natural features for a harmonious design.
Adding these details doesn’t have to be complicated. With a playful and creative approach, you can elevate your layout’s atmosphere. Every small element contributes to making the scene both engaging and authentic.
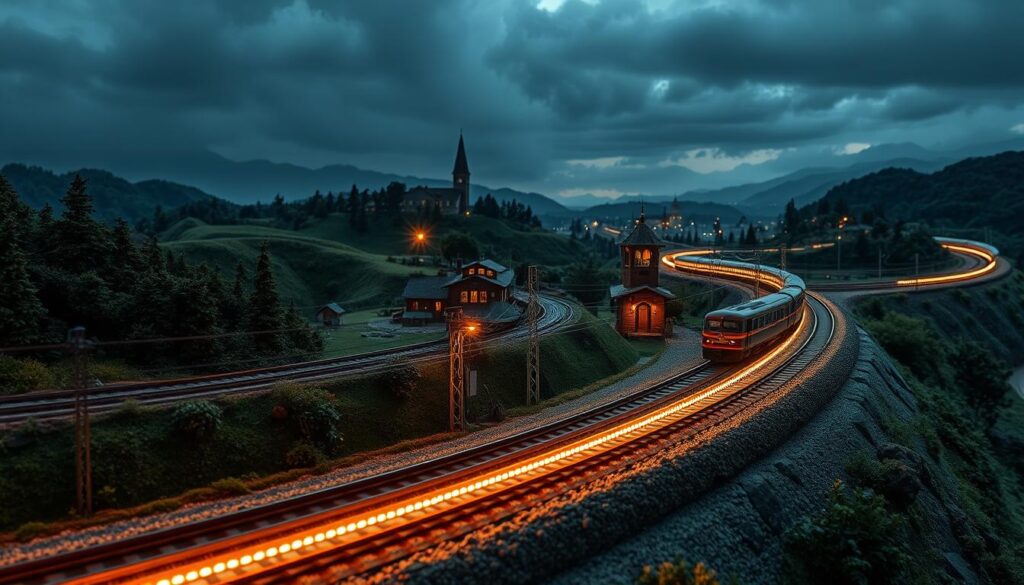
Innovative Methods for Color and Lighting in Scenery
Color and lighting are the secret ingredients to making your scenery pop. They add depth, mood, and realism to your layout, transforming it from flat to fantastic. With a few advanced techniques, you can create shadows, highlights, and even sunset effects that bring your railroad to life.
Creating Natural Shadows with Washes & Drybrushing
Washes are a simple yet powerful way to add depth and shadows to your scenery. I mix artist’s acrylics with water to create a thin, translucent paint. Applying this over rocks, buildings, or terrain creates natural shadows that make the details stand out.
Drybrushing is another favorite technique of mine. Using a nearly dry brush, I lightly drag it over raised surfaces to highlight textures. This works wonders for rocky areas or weathered structures, adding subtle contrast and realism.
Simulating Sunset Effects on Your Layout
Sunset lighting can add a magical touch to your railroad. I achieve this by layering warm washes of orange, pink, and yellow over the background. Adjusting the color temperature gradually creates a stunning gradient that mimics the natural transition from day to night.
Focal lighting is another trick I use to highlight specific areas. Placing small LED lights near key features, like a station or tunnel entrance. This draws attention and enhances the mood. It’s amazing how a little light can transform the entire feel of your layout.
Here are a few tips to get started:
- Start with light washes and build up layers for depth.
- Use drybrushing to emphasize textures and raised areas.
- Experiment with warm colors for sunset effects.
- Add focal lighting to create dramatic highlights.
These techniques may seem advanced, but they’re surprisingly easy to learn. With a bit of practice, you’ll see how natural shadows and strategic lighting can redefine your work. Don’t be afraid to experiment—every layout is unique, and these methods can make yours truly stand out.
Conclusion
Crafting a detailed railroad layout is a journey of creativity and precision. From selecting the right base materials to adding finishing touches like lighting and textures, every step brings your vision to life. Modern tools and techniques make it easier than ever to create realistic scenes, even for beginners.
Don’t be afraid to experiment with colors, textures, and unique details. Personalizing your layout makes it truly yours. Whether it’s a rugged mountain pass or a bustling town, every small detail adds depth and character.
Ready to begin and implement your model train scenery ideas? Then download the free eBook below to get started.
Want to build your dream model railroad? Download my FREE guide
Privacy Policy: We hate SPAM and promise to keep your email address safe
FAQ
What’s the best base material for my layout?
I recommend extruded foam for its lightweight and easy-to-shape properties. It’s perfect for creating hills, valleys, and other terrain features.
How do I make my layout look realistic?
Start by planning your design carefully. Use materials like ground foam for texture, and add details like trees, buildings, and figures to bring it to life.
What’s the difference between plaster and foam methods?
Plaster is great for detailed rock formations, while foam is better for larger terrain. I often combine both for a balanced, realistic look.
How do I create natural-looking rocks?
I use plaster casting or carve foam to shape rocks. Painting them with washes and drybrushing adds depth and realism.
What’s the best way to add trees and foliage?
I love using Woodland Scenics products. Their ground foam and pre-made trees are fantastic for creating lush, detailed landscapes.
How can I simulate water features like rivers?
I use clear resin or specialized water effects products. Adding layers and painting the base with blues and greens makes it look more natural.
What’s the easiest way to paint terrain?
I start with a base coat of latex paint, then use washes and drybrushing to add highlights and shadows. It’s simple but effective.
How do I design tunnels for my layout?
I carve tunnels into foam or plaster, ensuring they’re wide enough for the track. Adding rock textures and lighting inside makes them more realistic.
Can I use lighting to enhance my scenery?
Absolutely! I use LED lights to simulate sunset effects or create natural shadows. It adds a whole new dimension to the layout.
What’s the best adhesive for scenery materials?
I prefer matte medium or white glue. They’re strong, dry clear, and work well with most materials like foam, plaster, and ground foam.
